
Building an ESP32S3 Chatbot with Voice Interface
In this blog post, we’ll explore how to build a voice-controlled chatbot using the ESP32S3 microcontroller. This project combines speech recognition, AI-powered responses, and text-to-speech capabilities to create an interactive voice interface.
Prerequisites: Before diving into this project, make sure you’ve read our first blog post in the IoT Firmware series to understand the basics of ESP32 development and MicroPython setup.
⚡ Check out the project repository for the complete source code, detailed setup instructions, and to contribute to the project! Feel free to star the repo if you find it helpful. 🌟
Project Overview
This project creates a voice-controlled chatbot that can:
- Record audio input through a microphone
- Convert speech to text using Google’s Speech-to-Text API
- Generate AI responses using Google’s Gemini API
- Convert text responses back to speech using Google’s Text-to-Speech API
- Play audio output through a speaker
Hardware Components
| Component | Description | Pin Connection |
|---|---|---|
| ESP32S3 | Main microcontroller | - |
| INMP441 Microphone | Audio input | SCK: GPIO1, WS: GPIO4, SD: GPIO3 |
| MAX98357A Speaker | Audio output | BCK: GPIO1, WS: GPIO5, SD: GPIO6 |
| SD Card | Storage for audio files | CLK: GPIO2, MOSI: GPIO8, MISO: GPIO9, CS: GPIO7 |
| Chat Button | Trigger for chat mode | GPIO10 |
| Translate Button | Trigger for translation mode | GPIO11 |
| Status LED | Operation indicator | GPIO12 |
| Error LED | Error indicator | GPIO13 |
| NeoPixel LED | Visual feedback | GPIO21 |
Software Requirements
- MicroPython firmware for ESP32S3
- Google Cloud API key (for STT, TTS, and Gemini)
- WiFi credentials
- Required Python packages:
urequestsfor HTTP requestsneopixelfor LED controlnetworkfor WiFi connectivity
Project Structure
The project is organized into several key components:
Audio Input/Output
- I2S interface for microphone and speaker
- WAV file handling for audio storage
- Audio playback functionality
Cloud Services Integration
- Google Speech-to-Text for voice recognition
- Google Gemini for AI responses
- Google Text-to-Speech for voice synthesis
User Interface
- Dual-button control (chat and translate modes)
- LED indicators for status and errors
- NeoPixel for visual feedback
Key Features
1. Voice Recording
The system uses the INMP441 microphone to capture audio input while a button is held down. The audio is stored in WAV format on the SD card.
def record_while_button_held(pin):
    """
    Records audio while the specified button pin is held down.
    Returns the raw 16-bit samples of the recorded data.
    """
    # ... implementation details ...
2. Speech-to-Text
Recorded audio is sent to Google’s Speech-to-Text API for transcription:
def send_audio_to_google_stt(file_path="/sd/recorded_audio.wav"):
    """
    Send the recorded audio file to Google STT and return the transcription.
    """
    # ... implementation details ...
3. AI Response Generation
The transcribed text is sent to Google’s Gemini API for generating responses:
def send_text_to_gemini(prompt):
    """Sends text (prompt) to Gemini API and returns the AI-generated response."""
    # ... implementation details ...
4. Text-to-Speech
AI responses are converted to speech using Google’s Text-to-Speech API:
def text_to_speech(text):
    """Sends text to Google TTS, saves the audio to SD, and returns the filename."""
    # ... implementation details ...
Usage Modes
Chat Mode
- Press and hold the chat button
- Speak your message
- Release the button
- Wait for the AI response
- Listen to the spoken response
Translation Mode
- Press and hold the translate button
- Speak in English
- Release the button
- Wait for the Hindi translation
- Listen to the translated response
Error Handling
The system includes comprehensive error handling:
- WiFi connection status
- SD card operations
- API request failures
- Audio recording/playback issues
Each error is indicated by the error LED and appropriate console messages.
Future Improvements
Multi-language Support
- Add support for more languages in translation mode
- Implement language detection
Enhanced UI
- Add more visual feedback options
- Implement a display for text output
Power Management
- Implement sleep modes
- Add battery monitoring support
Offline Capabilities
- Add basic offline voice recognition
- Implement local response generation using tinyML
Project Gallery
Here’s how the final project looks when assembled:
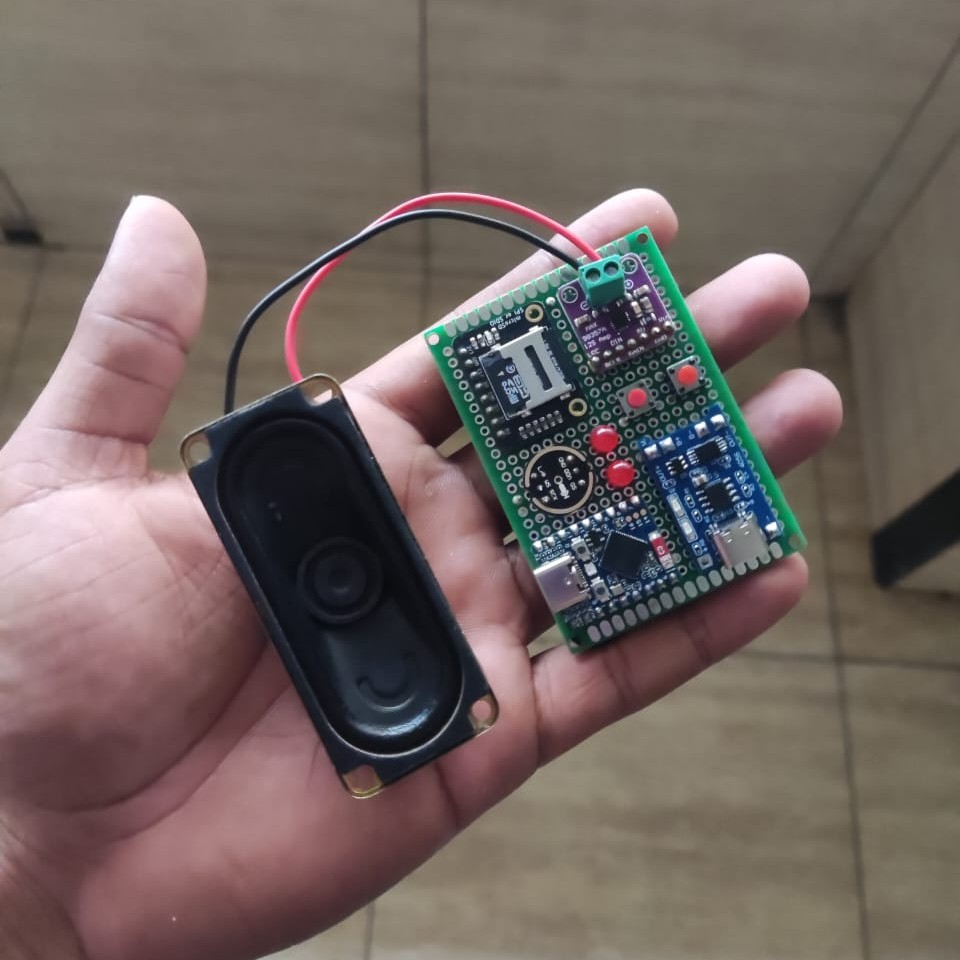
The completed ESP32S3 Chatbot with microphone, speaker, and control buttons. Notice the clean wiring and proper component placement.
Key Features Shown:
- ESP32S3 development board
- INMP441 microphone module
- MAX98357A I2S speaker
- SD card module
- Control buttons with LED indicators
- NeoPixel LED for status feedback
- Clean power distribution
- Custom 3D-printed enclosure
Conclusion
This project demonstrates the power of combining ESP32S3 with cloud services to create an interactive voice interface. The combination of speech recognition, AI, and text-to-speech creates a compelling user experience.
For more details and to contribute to the project, check out the GitHub repository.
Resources
Note: This project requires a Google Cloud API key for the speech and AI services. Make sure to keep your API key secure and never commit it to version control.