
TL;DR:
This post is a hands-on, attack-and-defend guide to MQTT in real IoT hardware.
- Shows: Setting up your own broker and ESP32‑C6 clients, capturing and decrypting real WiFi+MQTT traffic, and examining what attackers can realistically steal or inject.
- Covers: WPA2 decryption in Wireshark, MQTT packet structure, authenticating clients, dangers of weak/no auth, and all the traps IoT makers fall into.
- Takeaway: Even with WPA2 WiFi, MQTT is vulnerable without layered defenses—learn what real attacks look like, how to spot them, and how to build more robust MQTT-based systems.
Why another MQTT lab?
MQTT is everywhere in consumer IoT – light bulbs, sensors, cameras, “smart” plugs – but most of the time it is deployed with weak or no security. For this lab I wanted an end‑to‑end, reproducible setup where I could:
- Control both ends of the MQTT conversation (publisher and subscriber).
- Run my own broker on a small, realistic device (a Raspberry Pi Zero 2 W).
- Capture and inspect wireless traffic all the way from WPA2 handshakes to decrypted MQTT payloads.
This post walks through that setup, how I captured and analysed the traffic, what went wrong (packet injection), and where I want to take this lab next.
MQTT in a Nutshell
MQTT (Message Queuing Telemetry Transport) is a lightweight, efficient messaging protocol designed for resource-constrained devices and unreliable networks. Its popularity in IoT and smart home environments comes from its simple, flexible publish/subscribe model, which both empowers and exposes devices.
Let’s break down the core MQTT components and their roles:
1. Broker
- Definition: Central server/hub managing all message traffic.
- Responsibilities:
- Receives messages from publishers.
- Routes messages to subscribing clients.
- Maintains and manages:
- Topic subscriptions.
- Quality of Service (QoS) settings.
- Retained messages.
- Access control (if enabled).
- Popular Implementations:
- Mosquitto
- VerneMQ
- EMQX
- HiveMQ
- Deployment Flexibility: Runs on anything from Raspberry Pi to cloud VMs.
2. Client
- Definition: Any device or application connecting to the broker.
- Examples:
- Microcontrollers (e.g., ESP32‑C6)
- Smartphones
- Servers and cloud integrations
- Roles:
- Publisher, subscriber, or both at once.
- Identification: Each client uses a unique client ID when connecting.
3. Topics
- Purpose: Logical channels or names for messages; clients do not talk directly to each other.
- Format: UTF-8 strings structured like filesystem paths (e.g.,
lab/status,home/door/1/cmd). - Attributes:
- Case-sensitive.
- Unlimited hierarchy and depth.
- Security Note: Poorly designed topic structures can leak information or enable attack paths.
4. Publishing Messages
- Action: Any client can publish a payload to any topic.
- Example:
client.publish("lab/status", "alive") - Additional Options:
- Specify QoS level for delivery guarantees.
- Mark message as retained by the broker.
5. Subscribing to Topics
- Action: Clients register interest in specific topics.
- Example Subscriptions:
- Exact:
client.subscribe("lab/commands/light/1") - Wildcard:
client.subscribe("lab/+/cmd")
- Exact:
- Flexibility: Subscriptions can be added or removed without reconnecting.
6. Quality of Service (QoS) Levels
Specifies delivery reliability between clients and the broker:
- 0: At most once — fire-and-forget; no delivery guarantee.
- 1: At least once — guaranteed delivery but may be duplicated.
- 2: Exactly once — delivered once (no duplicates), with highest overhead.
7. Retained Messages
- Function: Messages can be flagged as “retained”; the broker stores the latest for each topic and sends it to any client that newly subscribes.
- Usefulness: Ideal for device status or state.
- Risk: Can create confusion or allow “poisoning” if not managed securely.
8. Last Will and Testament
- Purpose: Clients can designate a “last will”—a message for the broker to send if that client disconnects abruptly.
- Use Case: Automated detection/notification of device failures.
9. Wildcards in Topics
Allow for flexible and dynamic subscriptions:
+Wildcard: Matches any single path segment.
Example:lab/+/statusmatcheslab/door/statusandlab/temp/status.#Wildcard: Matches everything under a prefix.
Example:lab/#matches all topics starting withlab/.
10. Deployment and Security Implications
- Usual Placement: Broker runs on a home gateway, standalone server, or cloud platform.
- Connectivity: Devices connect via broker’s IP or DNS—often with credentials, but sometimes anonymously.
- Scaling/Automation: Devices are decoupled; never need to see or trust each other.
- Security Risks:
- If the broker or network is compromised, an attacker may access or inject data for all devices.
- Centralized power means centralized vulnerability.
Lab overview
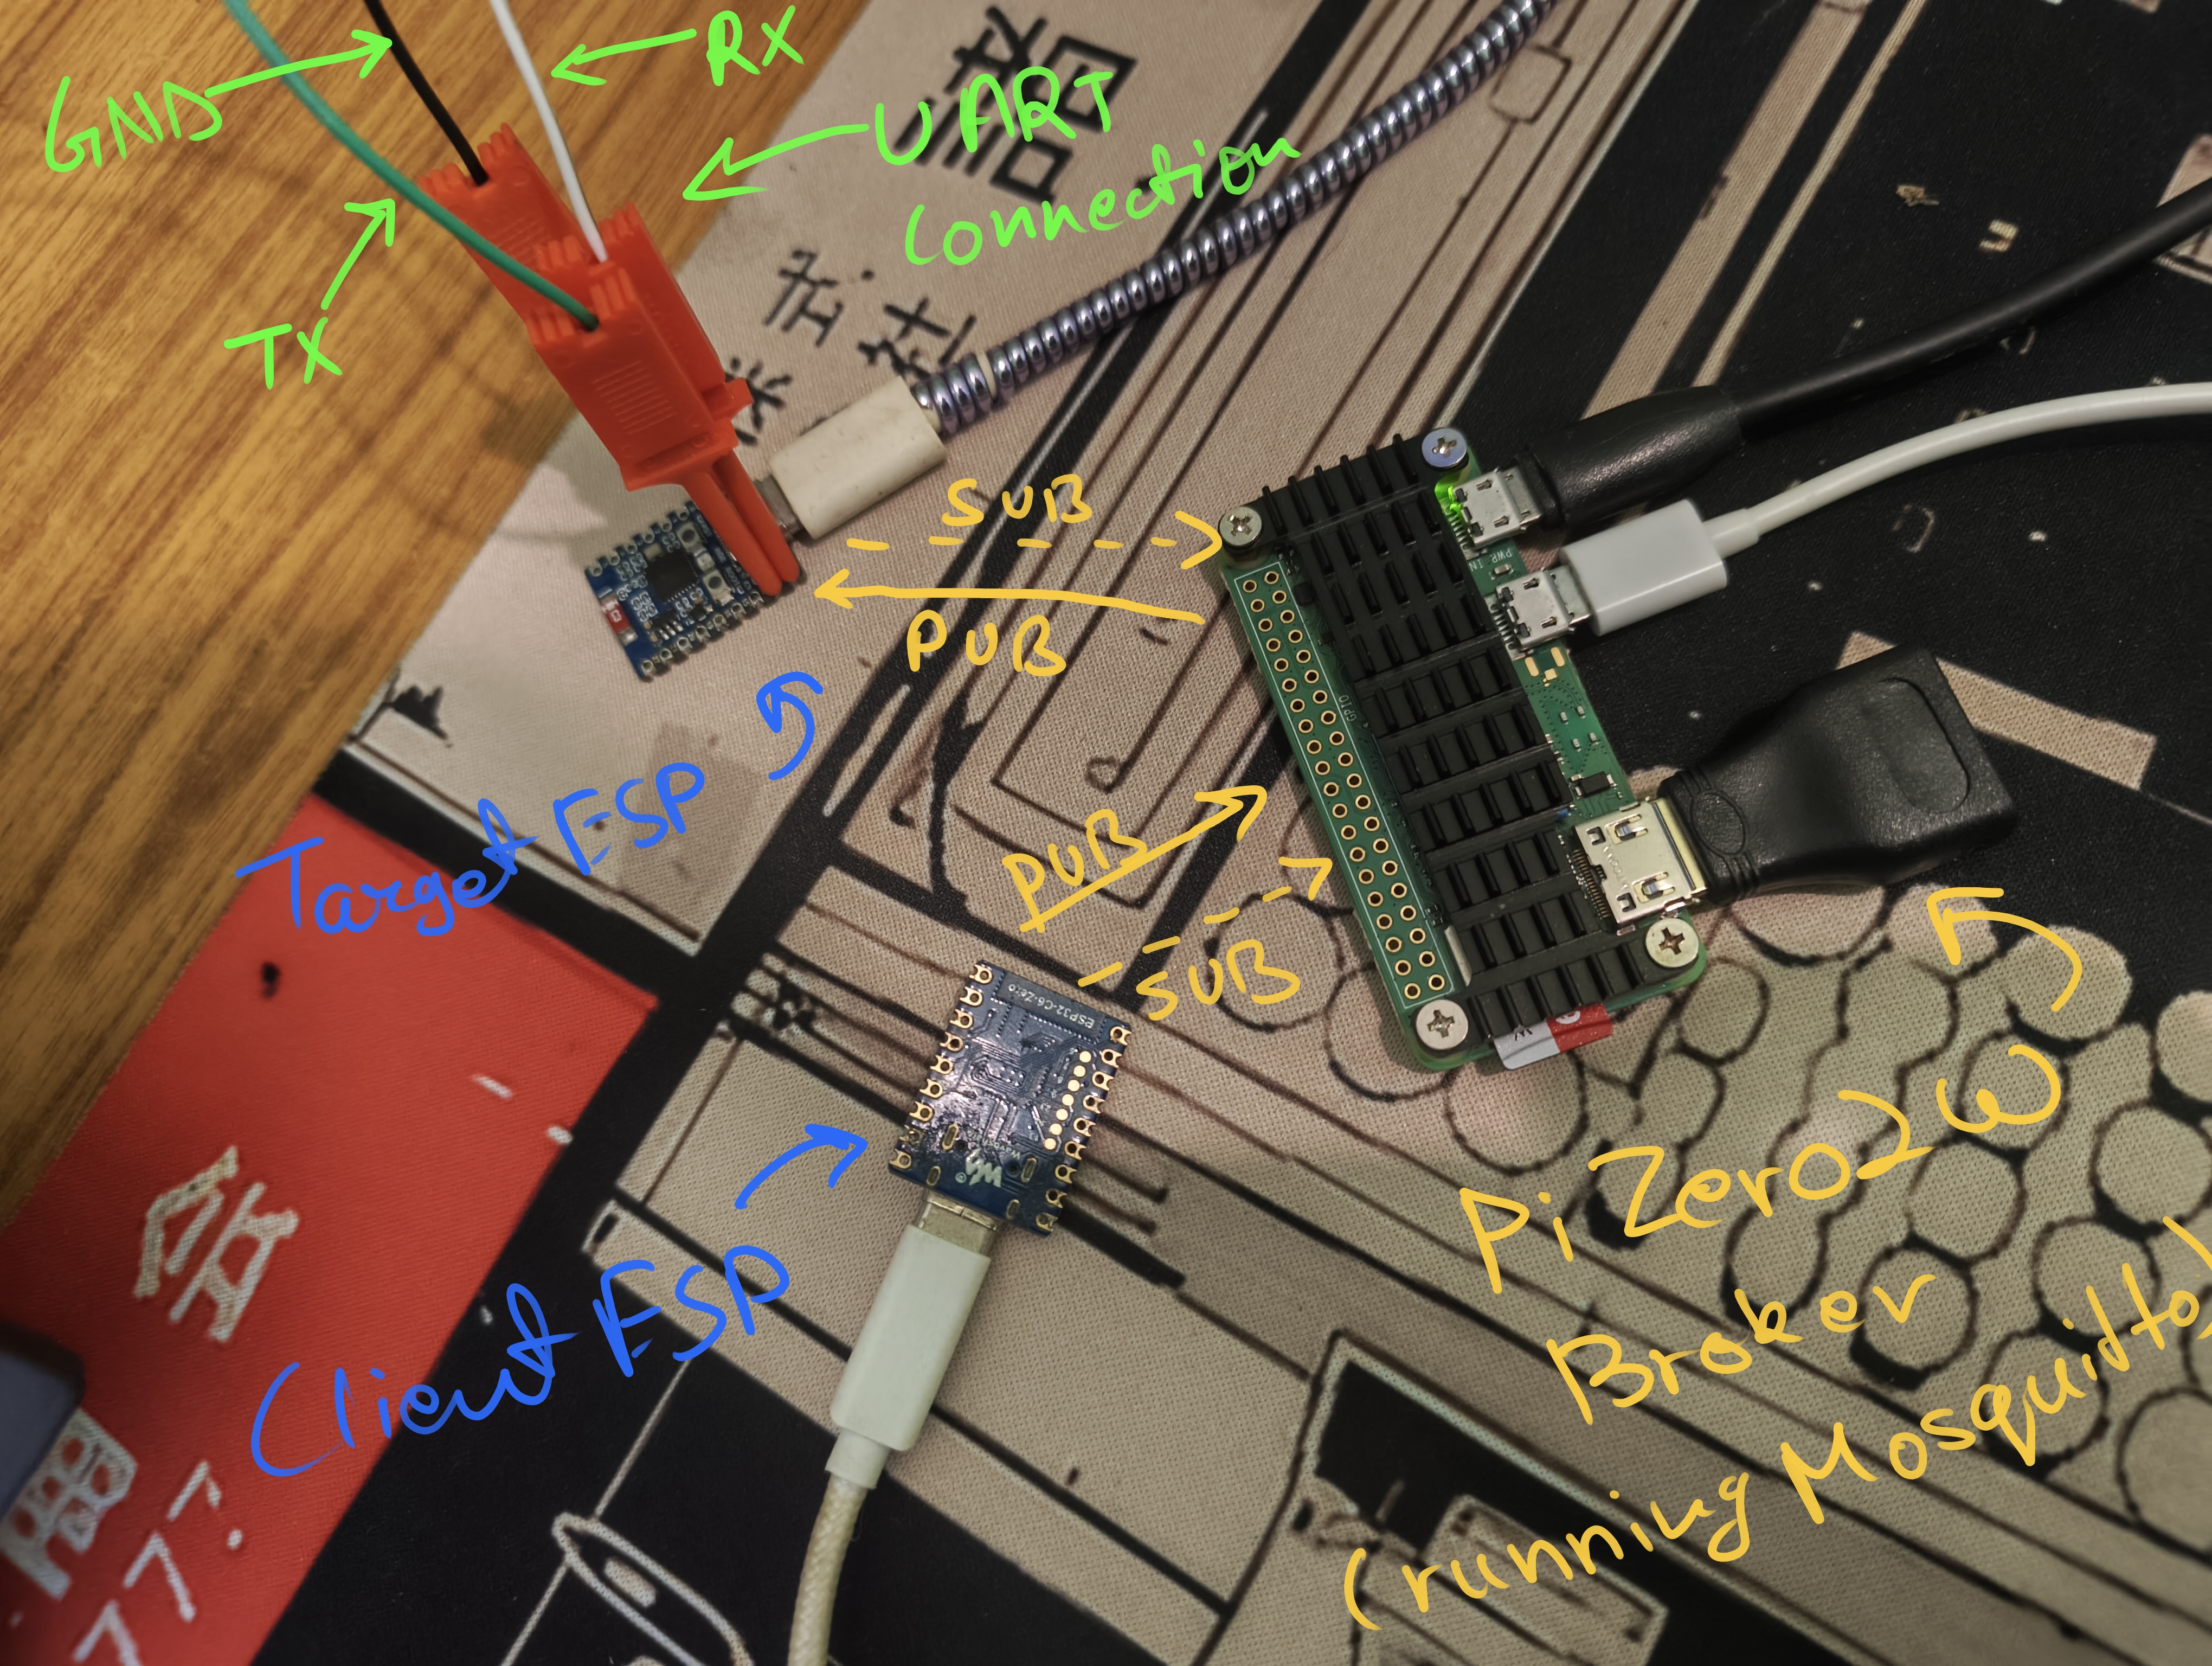
For this project I used:
- Broker: Raspberry Pi Zero running a standard MQTT broker (e.g. Mosquitto) on TCP port 1883.
- Clients: Two ESP32‑C6 Zero boards (Waveshare), running MicroPython.
- Firmware: Custom publisher/subscriber scripts from my repo
👉 MQTT-lab - Capture machine: A laptop running Linux, Wireshark and the aircrack‑ng tools.
- Network: Regular WPA2‑PSK WiFi, shared by the Pi Zero and both ESP32‑C6 boards.
The core idea is:
- ESP32‑C6 devices connect to WiFi and then to the MQTT broker on the Pi.
- One acts as the publisher, one as the subscriber.
- They exchange heartbeat messages and test payloads over a small topic hierarchy.
- Meanwhile, a separate WiFi adapter on the laptop sniffs and (attempts to) inject packets.
Threat model for this lab
To keep the lab realistic but focused, I assume a few concrete attacker capabilities:
- Same‑network attacker:
- Already knows / guessed / brute‑forced the WPA2‑PSK.
- Can join the same WiFi as the Pi and ESP32‑C6 boards.
- Rogue IoT device:
- Compromised or malicious device that joins the WiFi and speaks MQTT.
- Can use valid but overly‑permissive credentials (or anonymous access) on the broker.
- Passive RF eavesdropper:
- Sits nearby with a good WiFi card in monitor mode.
- Captures 802.11 frames and can later crack WPA2‑PSK offline to decrypt traffic.
- Active injector (future work):
- Same as above, but with a radio that supports stable packet injection to replay or forge frames.
In this threat model, WPA2 only protects the RF link. Once an attacker has WiFi access (legitimately or after cracking), MQTT traffic is still:
- Plaintext at the application layer (no TLS in this lab).
- Trusting the broker completely to route commands and data.
The broker is therefore a single point of failure for:
- Confidentiality – anyone who can reach the broker can subscribe to sensitive topics.
- Integrity – they can publish forged commands that appear to come from legitimate devices.
- Availability – flooding or crashing the broker can take the entire IoT “cluster” offline.
MQTT topics and components in this lab
The MQTT-lab repo provides two main scripts:
- Publisher (
publisher.py) - Subscriber (
subscribe.py)
Both share the same configuration pattern via a secrets.py file that is not committed to the repo.
Topics
In my setup, I used a simple topic structure along the lines of:
- Heartbeat:
lab/status - Commands:
lab/commands - Extra target topic (publisher only)
The flow looks like:
- Both devices subscribe to
MQTT_TOPIC_SUB(e.g.lab/commands). - Both devices publish periodic “alive” messages to
MQTT_TOPIC_PUB(e.g.lab/status). - The publisher additionally sends a “Check Check Check” message to
MQTT_TOPIC_TARGETto simulate a more targeted command channel.
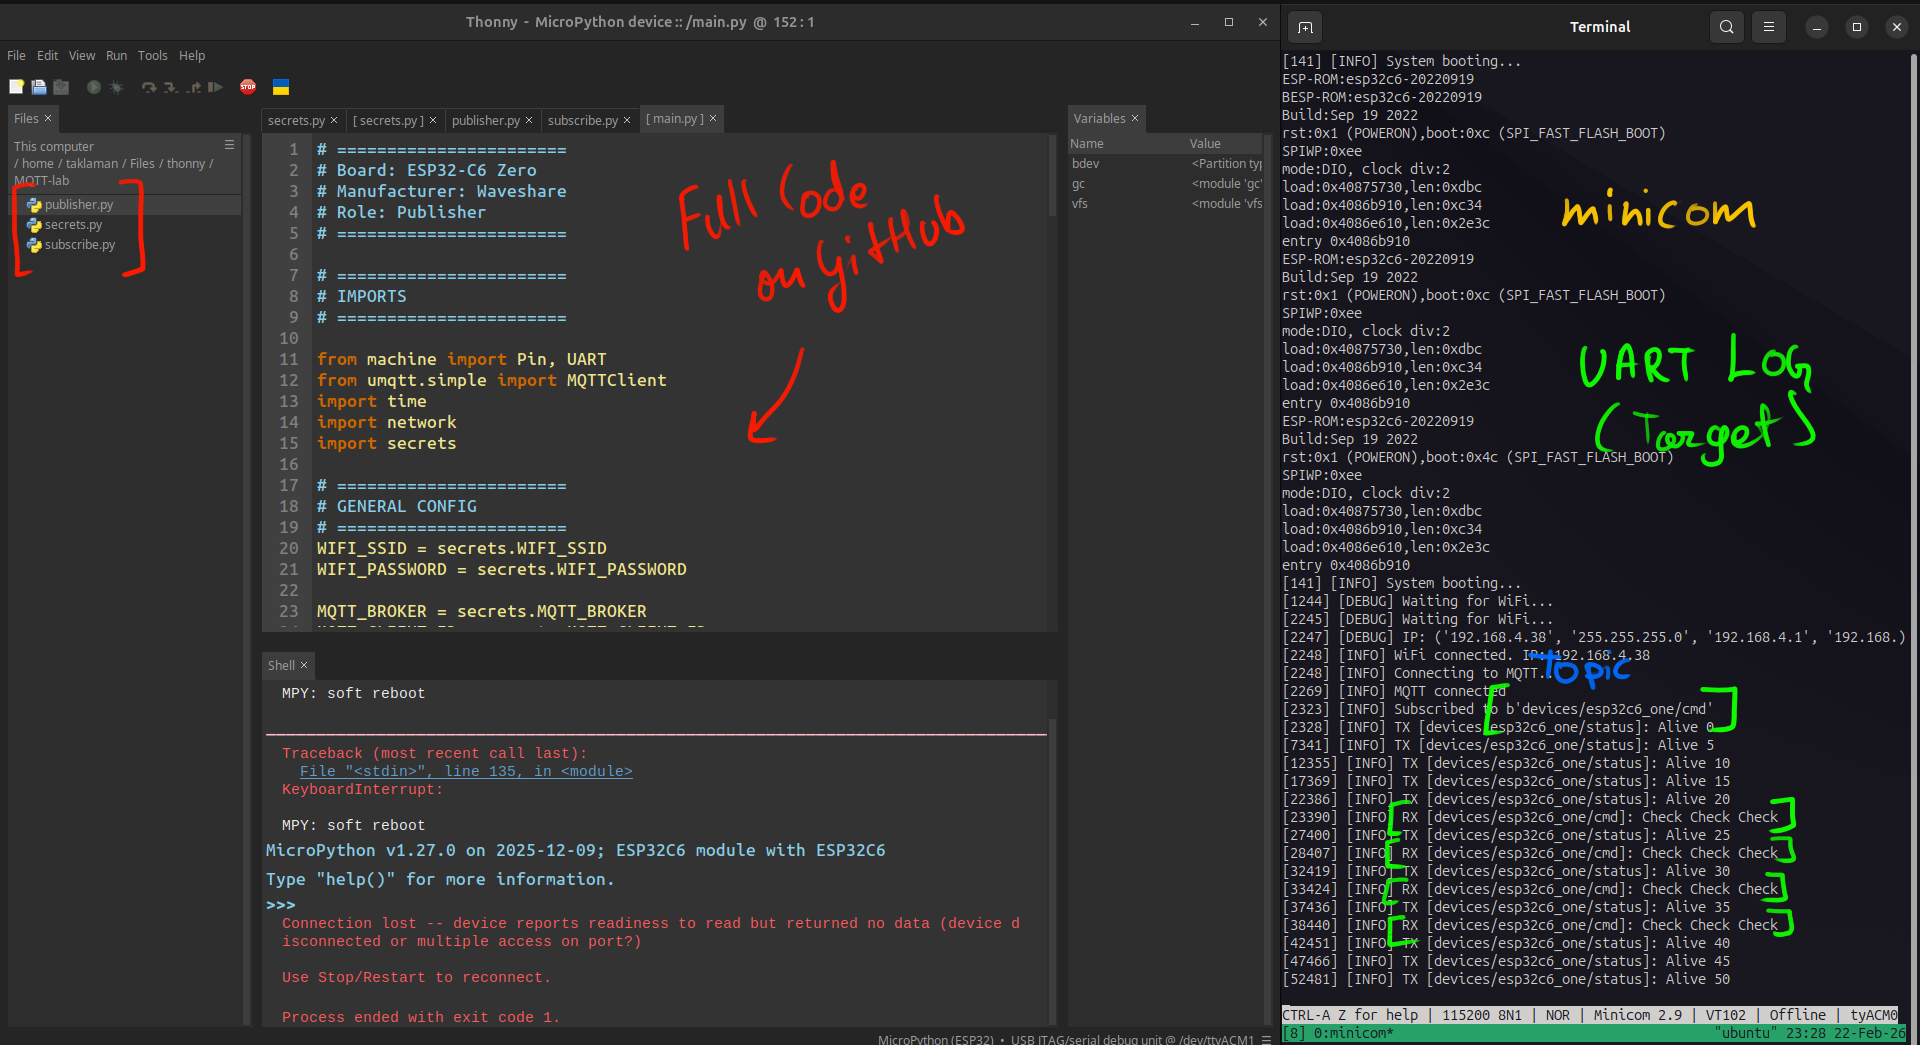
Because the subscriber logs every incoming message over UART (with timestamps and topic names), it is easy to correlate:
- What the devices think is happening (UART logs).
- What the network shows (Wireshark capture).
Setting up the Pi Zero 2 W MQTT broker
On the Raspberry Pi Zero 2 W, the broker setup is intentionally minimal so it resembles how many “quick labs” or hobby deployments are configured:
- Unauthenticated or weakly authenticated access (e.g. no client certificates, sometimes even no username/password).
- Plain MQTT over TCP port 1883, no TLS.
The rough steps are:
- Install an MQTT broker package (e.g. Mosquitto) from the distro repositories.
- Bind it to the Pi’s LAN IP address (e.g.
192.168.1.100) and listen on port1883. - (Optional but recommended) Add a simple user/password pair so you can later test credential brute forcing or misconfiguration scenarios.
- Verify connectivity from another machine using a CLI client (e.g.
mosquitto_pub/mosquitto_sub).
This broker becomes the central point that both ESP32‑C6 boards talk to.
Optional: running the Pi as its own WiFi AP
For some experiments I wanted the Pi Zero 2 W to act as a self‑contained WiFi access point for the ESP32‑C6 boards. I used two simple helper scripts:
#!/bin/bash
# ap_on.sh
set -e

echo "[*] Enabling AP mode..."

# Stop NetworkManager so it doesn't grab wlan0
sudo systemctl stop NetworkManager 2>/dev/null || true
sudo systemctl disable NetworkManager 2>/dev/null || true

# Stop wpa_supplicant just in case
sudo systemctl stop wpa_supplicant@wlan0 2>/dev/null || true
sudo systemctl disable wpa_supplicant@wlan0 2>/dev/null || true

# Ensure static IP config exists
if ! grep -q "static ip_address=192.168.4.1/24" /etc/dhcpcd.conf; then
  echo "[*] Configuring static IP for wlan0"
  sudo tee -a /etc/dhcpcd.conf > /dev/null <<EOF

interface wlan0
static ip_address=192.168.4.1/24
nohook wpa_supplicant
EOF
fi

# Restart dhcpcd so wlan0 switches to AP IP
sudo systemctl restart dhcpcd
sleep 2

# Start AP services
sudo systemctl unmask hostapd dnsmasq 2>/dev/null || true
sudo systemctl enable hostapd dnsmasq
sudo systemctl restart hostapd
sudo systemctl restart dnsmasq

echo "[+] AP mode enabled. SSID: PiAP  PASS: REDACTED"
And to switch back to normal client mode:
#!/bin/bash
# ap_off.sh
set -e

echo "[*] Disabling AP mode and restoring normal Wi-Fi..."

# Stop AP services
sudo systemctl stop hostapd dnsmasq 2>/dev/null || true
sudo systemctl disable hostapd dnsmasq 2>/dev/null || true

# Remove AP static config block safely
sudo sed -i '/interface wlan0/,+2d' /etc/dhcpcd.conf || true

# Restart dhcpcd
sudo systemctl restart dhcpcd

# Ensure NetworkManager controls Wi-Fi (Bookworm default)
sudo systemctl enable NetworkManager 2>/dev/null || true
sudo systemctl start NetworkManager 2>/dev/null || true

# Wait for NM to initialize
sleep 3

# Connect to saved Wi-Fi profile
sudo nmcli connection up "REDACTED"

echo "[+] Returned to normal Wi-Fi mode (REDACTED)"
With this, the Pi can either join an existing lab WiFi or host its own isolated AP for the MQTT experiments.
ESP32‑C6 clients with MicroPython
The firmware for the two ESP32‑C6 boards lives in the MQTT-lab repo and is written for MicroPython.
Configuration with secrets.py
All environment‑specific values are stored in a secrets.py next to the scripts:
- WiFi:
WIFI_SSIDWIFI_PASSWORD
- MQTT:
MQTT_BROKER(the Pi Zero 2 W’s IP/hostname)MQTT_CLIENT_ID(unique per device, e.g.esp32-pub-1/esp32-sub-1)MQTT_TOPIC_SUB(commands)MQTT_TOPIC_PUB(status)MQTT_TOPIC_TARGET(publisher‑only)
An example secrets.py (values redacted) looks like this:
WIFI_SSID = "REDACTED"
WIFI_PASSWORD = "REDACTED"

MQTT_BROKER = "192.168.4.1"
MQTT_CLIENT_ID = "esp32c6_zero_one"
MQTT_TOPIC_SUB = b"devices/esp32c6_one/cmd"
MQTT_TOPIC_PUB = b"devices/esp32c6_one/status"
# On the publisher board I additionally define:
# MQTT_TOPIC_TARGET = b"devices/esp32c6_one/target"
On boot the scripts:
- Bring up WiFi and connect to the configured AP.
- Connect to the MQTT broker at
MQTT_BROKER:1883. - Subscribe to
MQTT_TOPIC_SUB. - Enter a main loop where they:
- Call
client.check_msg()to process incoming messages. - Publish heartbeat messages every 5 seconds.
- (Publisher only) publish to
MQTT_TOPIC_TARGETperiodically.
- Call
All of this is logged over UART at 115200 baud with a small UARTLogger helper. This logging is crucial when you later compare broker‑side events and over‑the‑air captures.
Preparing WiFi for packet capture
To observe what is really happening on the air, you need a WiFi adapter that supports monitor mode. On my laptop I used airmon-ng to enable monitor mode, and then captured traffic directly in Wireshark from the monitor interface (wlp0s20f3mon).
Enabling monitor mode
- Identify the wireless interface (for me this was
wlp0s20f3). - Use
airmon-ngto place it into monitor mode and kill any conflicting processes:
sudo airmon-ng check kill
sudo airmon-ng start wlp0s20f3
- This creates a monitor interface (
wlp0s20f3mon) that can see raw 802.11 frames. You can confirm it exists and is up:
ip addr show wlp0s20f3mon
- (Optional) Do a quick passive scan of nearby APs and clients:
sudo airodump-ng wlp0s20f3mon
- Lock the card to the same channel as your target AP (channel 3 in my case) so you do not miss frames:
sudo iw dev wlp0s20f3mon set channel 3
sudo iw dev wlp0s20f3mon info
When you are doing this for more complex environments, there is a trade‑off:
- Channel hopping:
- Good for discovering many APs and clients.
- Risks missing EAPOL handshakes or short MQTT bursts because you are not on the right channel at the right moment.
- Channel locking (what I use here):
- You see everything that happens on a single channel, including full handshakes and all MQTT sessions on that BSS.
- You will miss devices that roam to, or live on, other channels – which is fine for a tightly scoped lab like this.
Capturing directly in Wireshark
With monitor mode enabled, I did not capture via airodump-ng. Instead:
- Open Wireshark and select the monitor interface (e.g.
wlp0s20f3mon). - Start a live capture and let both ESP32‑C6 devices associate to WiFi and begin MQTT traffic.
- Save captures as
pcapngso you can revisit decryption settings and filters later.
This gives you raw 802.11 management and data frames that Wireshark can later decrypt (once you supply the WPA2 key and have the required handshakes).
Packet injection challenges
Beyond passive capture, a common next step in WiFi labs is testing active capabilities (deauth/replay) which require packet injection support.
In my case, I was using the laptop’s internal WiFi card. I used aireplay-ng to check whether the adapter supports packet injection, and it was clearly not suitable/reliable for it.
Important clarification: packet injection was not performed in this lab run — I only validated the hardware capability and proceeded with passive capture + analysis.
This limitation is common: many built‑in WiFi chipsets are fine for sniffing but not for reliable injection. For serious wireless experiments you typically want:
- A USB adapter with well‑supported drivers.
- Explicit confirmation from community docs that it supports both monitor mode and injection.
For completeness, here is what the injection test looked like on my machine:
sudo aireplay-ng --test wlp0s20f3mon

00:25:52  Trying broadcast probe requests...
00:25:52  Injection is working!
00:25:54  Found 1 AP

00:25:54  Trying directed probe requests...
00:25:54  REDACTED - channel: 3 - 'REDACTED'
read failed: Network is down
wi_read(): Network is down
write failed: Network is down
wi_write(): Network is down
write failed: No such device or address
wi_write(): No such device or address
write failed: No such device or address
wi_write(): No such device or address
write failed: No such device or address
wi_write(): No such device or address
write failed: No such device or address
wi_write(): No such device or address

sudo airmon-ng stop wlp0s20f3mon
The card could technically inject a few frames, but the interface quickly became unstable (Network is down / No such device or address), which is why I treat this setup as capture‑only and recommend a dedicated USB adapter for serious injection work.
For now, this limited me to passive capture and analysis of the MQTT traffic.
Wireshark analysis
Once enough traffic was captured directly in Wireshark (from wlp0s20f3mon), the next step was to decrypt the WPA2 traffic and inspect MQTT at the application layer.
WPA2 decryption and EAPOL handshakes
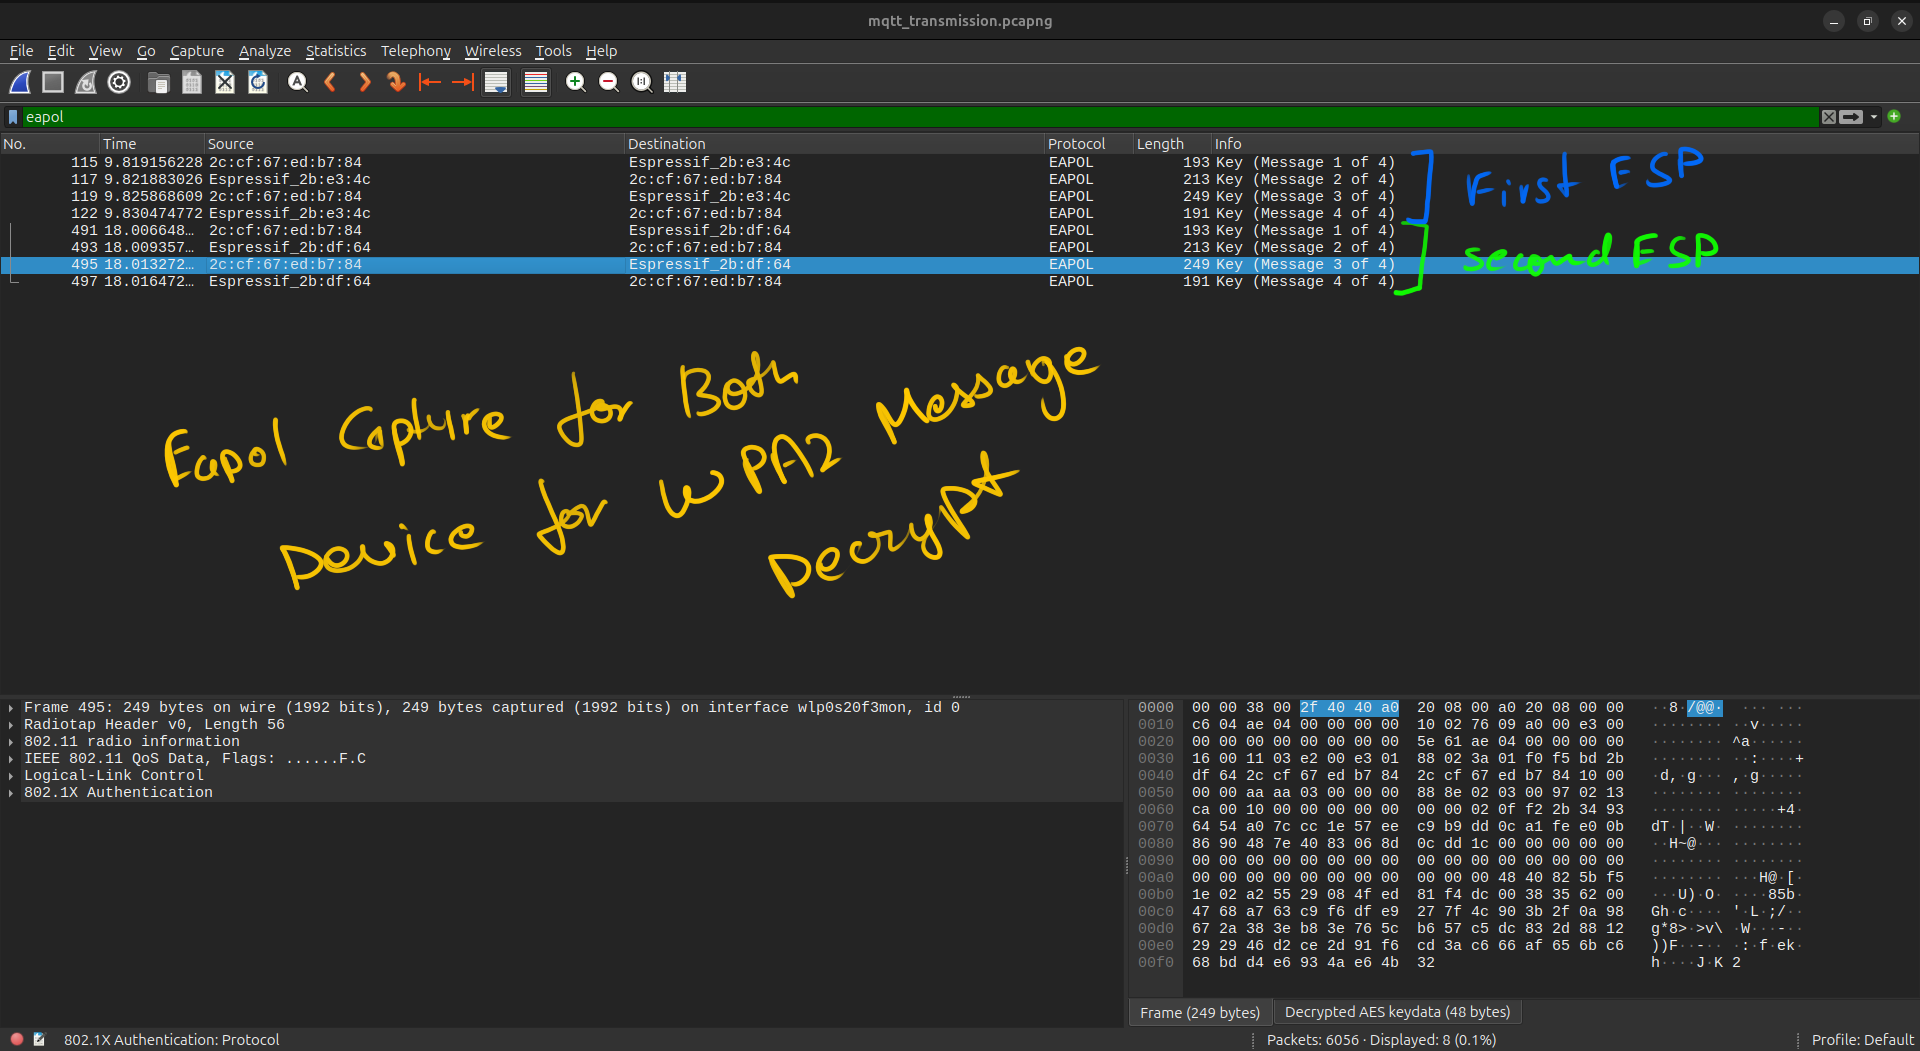
To decrypt WPA2‑PSK traffic in Wireshark, you need:
- The pre‑shared key (WiFi password).
- At least one complete 4‑way EAPOL handshake between the AP and each client you care about.
The rough process:
- Make sure both ESP32‑C6 boards connect after you start capturing, so their EAPOL exchanges are present.
- In Wireshark:
- Go to Preferences → Protocols → IEEE 802.11.
- Enable “Enable decryption”.
- Add your WPA2 passphrase under “Decryption keys” (using the
wpa-pwdformat).
- Once Wireshark associates the EAPOL handshake with the key, it can decrypt the data frames for that SSID.
If you are missing the EAPOL handshake for a particular device:
- Its packets remain as encrypted 802.11 data and you cannot see the TCP or MQTT layer.
- This is why capturing EAPOL for both ESP32‑C6 boards is important.
In larger environments, this becomes even more critical:
- You may need to force a re‑association (e.g. briefly power‑cycle a device or AP) to trigger a fresh 4‑way handshake while capturing.
- Each client/AP pair needs its own handshake captured; having one device’s handshake does not magically let you decrypt another’s traffic on the same SSID.
Inspecting MQTT payloads
After successful decryption, Wireshark can reconstruct the full stack:
- 802.11 → IP → TCP (port 1883) → MQTT
You can now:
- Filter on
mqttor by broker IP to isolate relevant flows. - See CONNECT, SUBSCRIBE, PUBLISH, PINGREQ/PINGRESP packets.
- Inspect:
- Topics used (
lab/status,lab/commands, etc.). - Payloads (e.g.
"Alive 42","Check Check Check"). - QoS levels, retain flags, keepalive intervals.
- Topics used (
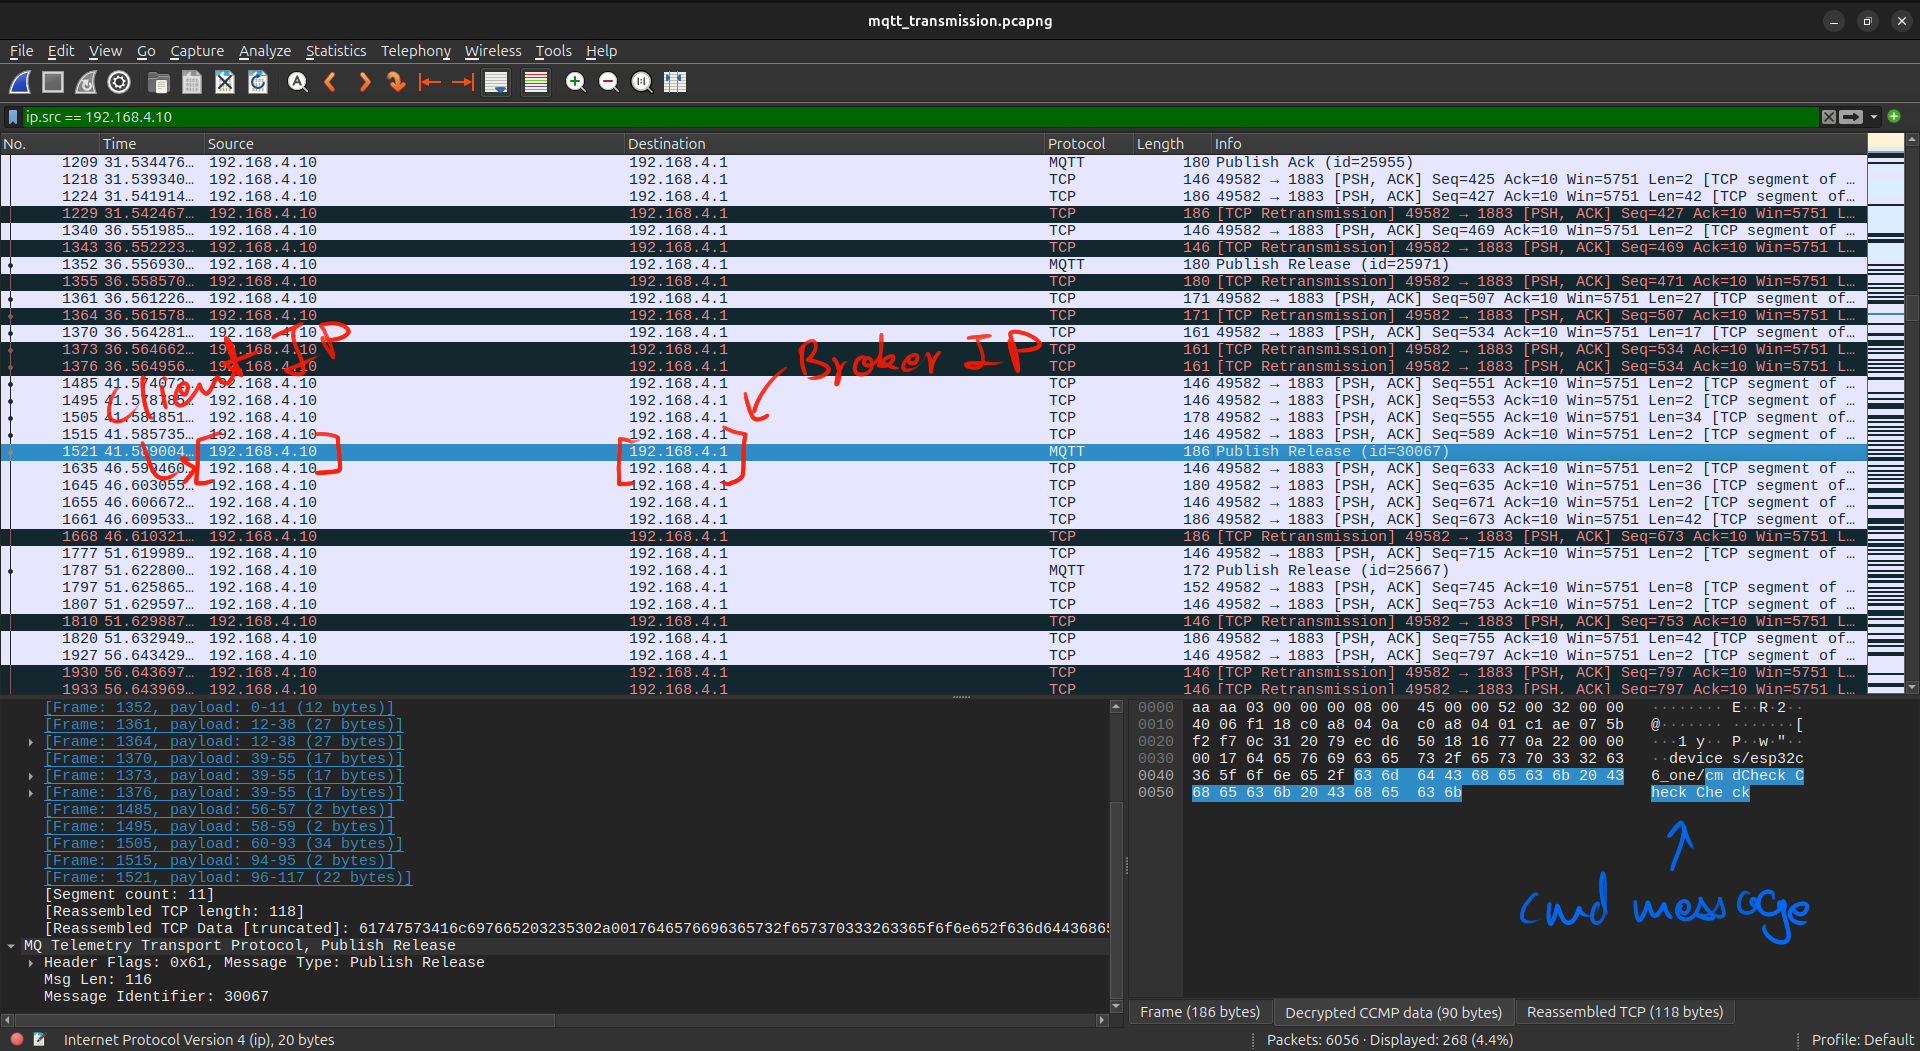
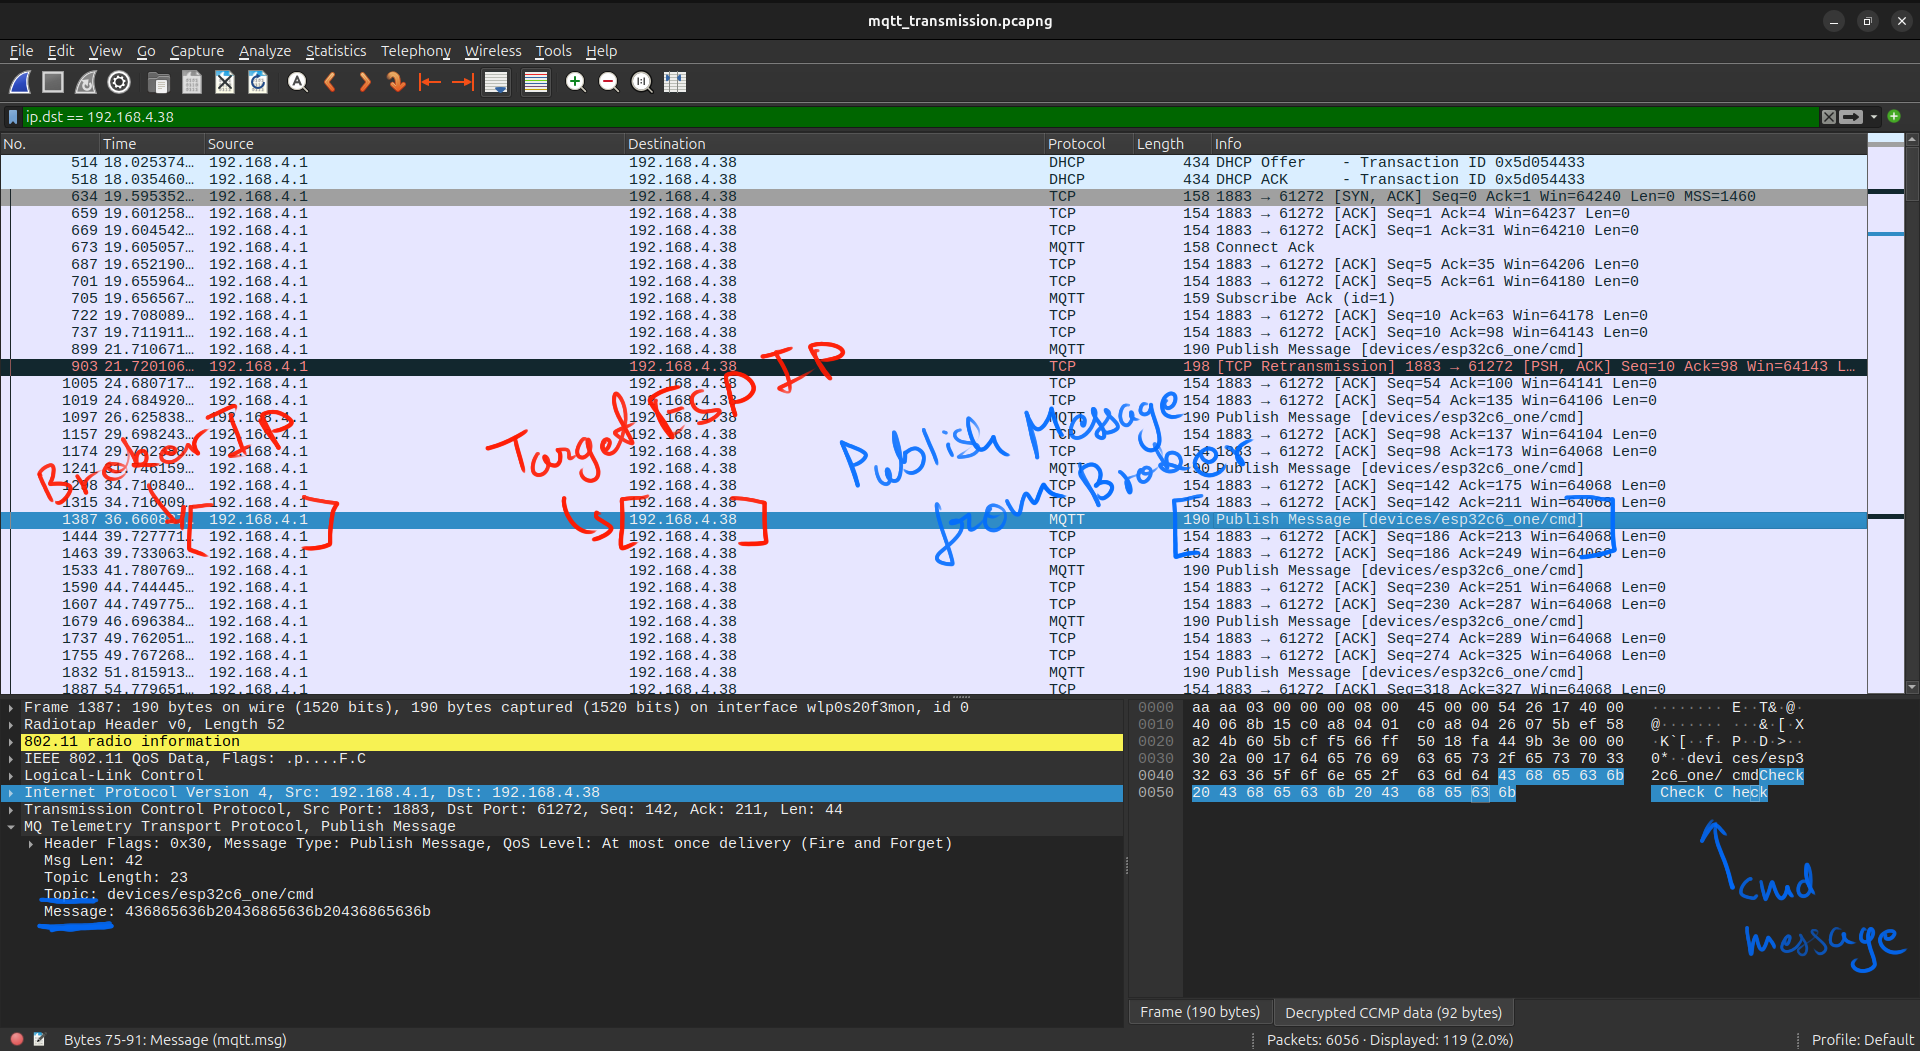
Comparing this with the UART logs from the devices gives a full picture:
- Device logs: “I just published Alive 45 to devices/device-1/status”.
- Wireshark: Matching MQTT PUBLISH to
devices/device-1/statuswith the same payload.
MQTT packet structure in practice
Looking at the MQTT layer in Wireshark is a good excuse to peek under the hood:
- CONNECT packets contain:
- Protocol name and level.
- Client ID (how the broker tracks sessions).
- Optional username/password.
- Keepalive value and flags such as Clean Session.
- SUBSCRIBE packets carry:
- One or more topic filters (like
devices/device-1/cmdordevices/#). - The requested QoS for each subscription.
- One or more topic filters (like
- PUBLISH packets include:
- The topic (e.g.
devices/esp32c6_one/status). - A packet identifier for QoS 1/2.
- The actual payload (
"Alive 45","Check Check Check", JSON, etc.).
- The topic (e.g.
A few flags and fields matter a lot for security:
- QoS:
- Higher QoS (1 or 2) means the broker stores state and may re‑deliver messages – handy for reliability, but also for replay‑style analysis.
- RETAIN:
- If set, a newly connecting client immediately receives the last retained message for that topic, which can leak historical state.
- DUP:
- Indicates a retransmission; useful when you are hunting for unreliable links or unusual traffic patterns.
By mapping:
- UART logs → when each script publishes or receives.
- Wireshark MQTT frames → which topics, QoS, and flags were used.
you get a full‑stack view from Python code to RF, which is ideal for both debugging and security analysis.
Attacker’s view: what can be stolen or injected?
Under the threat model earlier, an attacker who joins the WiFi and reaches the broker can:
- Eavesdrop on topics:
- Subscribe to known or guessed topics like
lab/statusordevices/+/status. - Abuse wildcards such as
lab/#to passively exfiltrate everything under a prefix.
- Subscribe to known or guessed topics like
- Inject commands:
- Publish to
lab/commandsor device‑specific.../cmdtopics with crafted payloads. - If the firmware trust these topics blindly, this is effectively remote code execution on the physical world (turning things on/off, changing modes, etc.).
- Publish to
- Probe topic namespaces:
- Trial‑and‑error subscriptions (
devices/#,lab/#,+/cmd,+/status) to map how you name devices and functions. - Predictable naming patterns make reconnaissance much easier.
- Trial‑and‑error subscriptions (
- Impersonate or collide with client IDs:
- Connect with the same
MQTT_CLIENT_IDas a real device. - Depending on broker settings, this can kick off the original client or hijack its session.
- Connect with the same
In this lab, the UART logging plus Wireshark captures make it very obvious when such abuse happens, but in real deployments there is often no logging or alerting on suspicious subscriptions or publishes.
Real‑world exploitation paths with this setup
The same simple lab can model several realistic IoT attack paths:
- Rogue device joining the network:
- Attacker brings their own ESP32 or Linux client, connects to the WPA2 network, and points it at the Pi broker.
- With no ACLs, a single wildcard subscription like
#ordevices/#is enough to quietly observe every topic the broker sees.
taklaman@ubuntu:~$ mosquitto_sub -h 192.168.4.1 -t "#" -v
devices/esp32c6_two/status Alive 65
devices/esp32c6_one/cmd Check Check Check
devices/esp32c6_one/status Alive 50
devices/esp32c6_two/status Alive 70
devices/esp32c6_one/status Alive 55
devices/esp32c6_two/status Alive 75
devices/esp32c6_one/status Alive 60
In this capture from the lab, a rogue client on the same WiFi instantly learns both status and command topics for multiple devices, without any device‑specific secrets or firmware exploits.
- Wildcard subscription abuse for lateral movement:
- Once on the broker, subscribe to
+/cmdordevices/#and watch which topics carry control messages. - Then selectively publish to those topics to control other devices that were never meant to talk to the attacker directly.
- Once on the broker, subscribe to
- Session takeover via client‑ID collision:
- Connect as
esp32c6_zero_onewith a malicious client. - If the broker drops the original connection, you now own that device’s logical identity and can publish and subscribe as if you were the legitimate board.
- Connect as
- Replay and persistence abuse:
- With QoS 1/2 and retained messages, stale commands or state can be delivered to devices that come online later.
- An attacker who can publish retained messages can effectively “seed” the future behaviour of devices that have not even connected yet.
These scenarios are exactly the kind of thing I want to keep exploring as I harden the lab and add more complex devices and traffic patterns.
Security observations and ideas
From this baseline lab, a few immediate security takeaways stand out:
- Plain MQTT over WPA2 is not enough:
- WPA2 protects only the radio link; once the key is known, MQTT is just cleartext TCP.
- Anyone with WiFi access (or a cracked WPA2 key) can read and inject MQTT messages.
- Topic design matters:
- Overly broad or predictable topic paths make it easier to subscribe or inject malicious commands.
- Broker configuration is critical:
- Default or anonymous access on the broker means any device on the network can become a “trusted” client.
- The broker is the one component that can centrally enforce authentication, authorization, logging, and rate limiting – or none of the above.
This is exactly the kind of environment attackers look for in real IoT deployments.
Hardening this lab for production‑style security
The nice thing about having a deliberately weak lab is that you can tighten it step by step. For this exact setup, a practical hardening checklist looks like:
- Transport:
- Move from plain MQTT on
1883to MQTT over TLS (8883) with a minimal internal CA.
- Move from plain MQTT on
- Authentication:
- Require per‑device credentials (username/password, certificates, or both).
- Authorization / ACLs:
- Use broker‑side ACLs so each client can only publish/subscribe to its own topics.
- Topic namespace design:
- Avoid global wildcards like
lab/#for production code; scope topics per device or per role.
- Avoid global wildcards like
- Logging and alerting:
- Log all wildcard subscriptions, failed logins, and unusual topic access.
- Add simple alerts for events such as “new client used
#” or “client ID changed IPs suddenly”.
- Client ID discipline:
- Make client IDs unique, stable, and hard to guess, and configure the broker to reject duplicates or alert on collisions.
A side‑by‑side view of insecure vs hardened configurations:
| Aspect | Lab‑style / Insecure | Hardened / Production‑style |
|---|---|---|
| Transport | MQTT over TCP 1883, no TLS | MQTT over TLS 8883 with server and device certificates |
| Authentication | Anonymous or shared username/password | Per‑device credentials, rotated and revoked when compromised |
| Authorization (ACLs) | All clients can publish/subscribe anywhere | Each client restricted to a small set of topics it actually needs |
| Topic design | Predictable, broad topics (e.g. lab/#) | Scoped topics per device/tenant, no global wildcards in normal operation |
| Logging/monitoring | Minimal or default broker logs | Centralized logs, alerts on wildcard use, brute‑force, and weird patterns |
| Client identity | Short, guessable IDs (e.g. esp32-one) | Long, unique IDs; broker rejects duplicates or flags takeovers |
The lab intentionally starts on the left‑hand side of this table so that the risks are visible in Wireshark and UART logs, and then it can be gradually migrated toward the right‑hand side as part of future experiments.
Future plans for the lab
This initial setup was deliberately simple and insecure. Next steps I want to explore include:
- TLS for MQTT:
- Move from MQTT on port 1883 to MQTT over TLS (e.g. port 8883).
- Generate a small private CA and device certificates.
- Capture and compare encrypted vs. decrypted traffic.
- Stronger broker authentication and authorization:
- Enforce per‑client credentials.
- Use ACLs to restrict which topics each client can publish/subscribe to.
- Cloud‑hosted broker experiments:
- Move the Pi Zero broker to a cloud instance or use a managed MQTT broker.
- Study how WAN latency and public exposure change the attack surface.
- Wildcard topic abuse:
- Test attacks using
#and+to subscribe to overly broad sets of topics. - See how misconfigured ACLs leak data between tenants or device groups.
- Test attacks using
- Additional attacks and defenses:
- Experiment with properly supported injection hardware to revisit deauth and replay.
- Try fuzzing MQTT clients and the broker with malformed packets.
- Add detection/alerting on suspicious patterns (e.g. unexpected wildcard subscriptions, brute‑force connection attempts).
All of this will build on the same controlled, reproducible infrastructure: Pi Zero broker, ESP32‑C6 clients running MicroPython from the MQTT-lab repo, and a dedicated capture machine. The goal is to turn this into a small but powerful playground for learning and teaching MQTT security.
Relevant Links
MQTT-lab GitHub Repository Source code for the MicroPython examples, ESP32 client code, and infrastructure used in the lab.
Eclipse Mosquitto (MQTT Broker) Popular lightweight open source MQTT broker used in the experiments.
Wireshark Network protocol analyzer used for packet capture and analysis.
MicroPython Python implementation running on microcontrollers (used on the ESP32-C6 clients).
ESP32-C6 by Espressif Hardware platform used for the MQTT clients.
MicroPython umqtt.simple Library Minimal MQTT client used on MicroPython devices.
If you’re new to MQTT, the HiveMQ MQTT Essentials article series is a helpful introduction.